

change the section where we provision smart contract code: - create a new empty project - use the “Understanding IOUs” section to explain the structure of a daml contract (see Java language bindings) - transact on the IOU contract using curl and JSON Ledger API, not via console commands
Getting Started
Interested in Canton? This is the right place to start! You don’t need any prerequisite knowledge, and you will learn:- how to install Canton and get it up and running in a simple test configuration
- the main concepts of Canton
- the main configuration options
- some simple diagnostic commands on Canton
- the basics of Canton identity management
- how to upload and execute new smart contract code
Installation
Canton is a JVM application. To run it natively you need Java 11 or higher installed on your system. Alternatively Canton is available as a Docker image atghcr.io/digital-asset/decentralized-canton-sync/docker/canton; published tags are listed on the decentralized-canton-sync packages page. See the Version Compatibility Dashboard for the current tag for each network.
Canton is platform-agnostic. For development purposes, it runs on macOS, Linux, and Windows. Linux is the supported platform for production.
Note: Windows garbles the Canton console output unless you are running Windows 10 and you enable terminal colors (e.g., by running cmd.exe and then executing reg add HKCU\Console /v VirtualTerminalLevel /t REG_DWORD /d 1).
To start, download the latest release and extract the archive.
The extracted archive has the following structure:
bin: contains the scripts for running Canton (cantonunder Unix-like systems andcanton.batunder Windows)config: contains a set of reference configuration files for each node typedaml: contains the source code for some sample smart contractsdars: contains the compiled and packaged code of the above contractsdemo: contains everything needed to run the interactive Canton demoexamples: contains sample configuration and script files for the Canton consolelib: contains the Java executables (JARs) needed to run Canton
Starting Canton
While Canton supports a daemon mode for production purposes, in this tutorial we will use its console, a built-in interactive read-evaluate-print loop (REPL). The REPL gives you an out-of-the-box interface to all Canton features. In addition, as it’s built using Ammonite, you also have the full power of Scala if you need to extend it with new scripts. As such, any valid Scala expression can be typed inside the console:bin/canton, you can also start Canton directly with java -jar lib/canton-*.jar, assuming all other jar dependencies are in the lib folder, too.
Next, run
examples/01-simple-topology/simple-topology.conf. You will see the banner on your screen
help to see the available commands in the console:
The example topology
To understand the basic elements of Canton, let’s briefly look at this starting configuration. It is written in the HOCON format as shown below. It specifies that you wish to run two participant nodes, whose local aliases areparticipant1 and participant2, and a single synchronizer, with the local alias mysynchronizer. It also specifies the storage backend that each node should use (in this tutorial we’re using in-memory storage), and the network ports for various services, which we will describe shortly.

- manage the participant node’s connections to synchronizers
- add or remove parties to be hosted at the participant node
- upload new Daml archives
- configure the operational data of the participant, such as cryptographic keys
- run diagnostic commands
Canton’s Admin APIs must not be confused with the
admin package of the gRPC Ledger API. The admin package of the Ledger API provides services for managing parties and packages on any Daml participant. Canton’s Admin APIs allows you to administrate Canton-based nodes. Both the participant node and the synchronizer expose an Admin API with partially overlapping functionality.participant1 and participant2 should connect to mysynchronizer. Canton connections are not statically configured — they are added dynamically. So first, let’s connect the participants to the synchronizer.
Connecting The Participant Nodes and Synchronizers
Using the console we can run commands on each of the configured participant nodes and synchronizers. As such, we can check their health using thehealth.status command:
participant1:
mysynchronizer, participant1 and participant2 come from the configuration file. By default, Canton will start and initialize the nodes automatically. This behavior can be overridden using the --manual-start command line flag or appropriate configuration settings.
For the moment, ignore the long hexadecimal strings that follow the node aliases; these have to do with Canton’s identities, which we will explain shortly.
You can now bootstrap the synchronizer:
ping command uses a particular smart contract that is by default pre-installed on every Canton participant. In fact, the command uses the Admin API to access a pre-installed application, which then issues Ledger API commands operating on this smart contract.
In theory, you could use your participant node’s built-in party for all your application’s smart contract interactions, but it’s often useful to have more parties than participants. For example, you might want to run a single participant node within a company, with each employee being a separate party. For this, you need to be able to provision parties.
Canton Identities and Provisioning Parties
In Canton, the identity of each party, node (participant, sequencer or mediator), or synchronizer is represented by a unique identifier. A unique identifier consists of two components: a human-readable string and the fingerprint of a public key. When displayed in Canton the components are separated by a double colon. You can see the identifiers of the different nodes by running the following in the console:- signed by this namespace key, or
- signed by a key that is authorized by the namespace key to speak in the name of this identity, either directly or indirectly (e.g., if
k1can speak in the name ofk2andk2can speak in the name ofk3, thenk1can also speak in the name ofk3).
simple-topology.conf uses memory storage, which is not persistent).
Creating Parties
You will next create two parties, Alice and Bob. Alice will be hosted atparticipant1, and her identity will use the namespace of participant1. Similarly, Bob will use participant2. Canton provides a handy macro for this:
participant1 and participant1 holds the secret key of this namespace. You can check that the parties are now known to the different nodes by running the following:
Extracting identifiers
Canton identifiers can be long strings. They are normally truncated for convenience. However, in some cases we do have to extract these identifiers so they can be shared through other channels. As an example, if you have two participants that run in completely different locations, without a shared console, then you can’t ping as we did before:UniqueIdentifier and the context in which this identifier is used. This allows you to directly access the identifier serialization:
Provisioning Smart Contract Code
To create a contract between Alice and Bob, you must first provision the contract’s code to both of their hosting participants. Canton supports smart contracts written in Daml. A Daml contract’s code is specified using a Daml contract template; an actual contract is then a template instance. Daml templates are packaged into Daml archives, or DARs for short. For this tutorial, use the pre-packageddars/CantonExamples.dar file. To provision it to both participant1 and participant2, you can use the participants.all bulk operator:
nodes:
.local, .all or .remote, where the remote refers to remote nodes, which we won’t use here.
To validate that the DAR has been uploaded, run:
mysynchronizer. You will simply get an error if you run mysynchronizer.dars.list(). This is because the synchronizer does not know anything about Daml or smart contracts. All the contract code is only executed by the involved participants on a need-to-know basis and needs to be explicitly enabled by them.
Now you are ready to start running smart contracts using Canton.
Executing Smart Contracts
Let’s start by looking at some smart contract code. In our example, we’ll have three parties, Alice, Bob and the Bank. In the scenario, Alice and Bob will agree that Bob has to paint her house. In exchange, Bob will get a digital bank note (I-Owe-You, IOU) from Alice, issued by a bank. First, we need to add the Bank as a party:waitForSynchronizer argument here. This is necessary to force some synchronization between the nodes to ensure that the new party is known within the distributed system before it is used.
Canton alleviates most synchronization issues when interacting with Daml contracts. Nevertheless, Canton is a concurrent, distributed system. All operations happen asynchronously. Creating the
Bank party is an operation local to participant2, and mysynchronizer becomes aware of the party with a delay (see Topology Transactions for more detail). Processing and network delays also exist for all other operations that affect multiple nodes, though everyone sees the operations on the synchronizer in the same order. When you execute commands interactively, the delays are usually too small to notice. However, if you’re programming Canton scripts or applications that talk to multiple nodes, you might need some form of manual synchronization. Most Canton console commands have some form of synchronization to simplify your life and sometimes, using utils.retry_until_true(...) is a handy solution.CantonExamples.dar, which includes the contracts. Now we can create our first contract using the template Iou.Iou. The name of the template is not enough to uniquely identify it. We also need the package ID, which is just the sha256 hash of the binary module containing the respective template.
Find that package by running:
Bank on participant2. Interestingly, we can test here the Daml authorization logic. As the signatory of the contract is Bank, we can’t have Alice submitting the contract:
Active Contract Set (ACS) for it:
CreatedEvents in the Canton console:
Iou module is not aware of the Paint module, but the Paint module is using the Iou module within its workflow. This is how we can extend any workflow in Daml and build on top of it. In particular, the Bank does not need to know about the Paint module at all, but can still participate in the transaction without any adverse effect. As a result, everybody can extend the system with their own functionality. Let’s create and submit the offer now:
Privacy
Looking at the ACS of Alice, Bob and the Bank, we note that Bob sees only the paint offer:mysynchronizer does receive this data, the data is encrypted and mysynchronizer cannot read it.
We can run such a step with sub-transaction privacy by accepting the offer, which will lead to the transfer of the Bank IOU, without the Bank learning about the Paint agreement:
Note that the conversion to LfContractId was required to pass in the IOU contract ID as the correct type.
Your Development Choices
While theledger_api functions in the Console can be handy for educational purposes, the Daml SDK provides you with much more convenient tools to inspect and manipulate the ledger content: - Daml Script for scripting - Language bindings to build your own applications
All these tools work against the Ledger API.
Automation Using Bootstrap Scripts
You can configure a bootstrap script to avoid having to manually complete routine tasks such as starting nodes or provisioning parties each time Canton is started. Bootstrap scripts are automatically run after Canton has started and can contain any valid Canton Console commands. A bootstrap script is passed via the--bootstrap CLI argument when starting Canton. By convention, we use a .canton file ending.
For example, the bootstrap script to connect the participant nodes to the local synchronizer and ping participant1 from participant2 (see Starting and Connecting The Nodes) is:
retry_until_true to add a manual synchronization point, making sure that participant2 is registered, before proceeding to ping participant1.
Tutorial to download, install, run canton with a simple configuration. Link to other howtos for follow-up topics.
Install Canton
This guide will guide you through the process of setting up your Canton nodes to build a distributed Daml ledger. You will learn the following:- How to set up and configure a participant node
- How to set up and configure an embedded or distributed synchronizer
- How to connect a participant node to a synchronizer
config and explains how to leverage these examples for your purposes. Therefore, any file named in this guide refers to subdirectories of the reference configuration example.
Hardware Resources
Adequate hardware resources need to be available for each Canton node in a test, staging, or production environment. It is recommended to begin with a potentially over-provisioned system. Once a long running, performance benchmark has proven that the application’s NFRs can be met (e.g., application request latency, PQS query response time, etc.) then decreasing the available resources can be tried, with a follow up rerun of the benchmark to confirm the NFRs can still be met. Alternatively, if the NFRs are not met then the available resources should be increased. As a starting point, the minimum recommended resources are:- The physical host, virtual machine, or container has 6 GB of RAM and at least 4 CPU cores.
- The JVM has at least 4 GB RAM.
-XX:+UseG1GC to force the JVM to to use the G1 garbage collector. Experience has shown that the JVM may use a different garbage collector in a low resource situation which can result in long latencies.
Downloading Canton
Canton is open source, licensed under Apache 2.0, and available from GitHub. No license or entitlement is required. You can also use the Canton Docker image described in Installation.Your Topology
The first question we need to address is what the topology is that you are going after. The Canton topology is made up of parties, participants and synchronizers, as depicted in the following figure.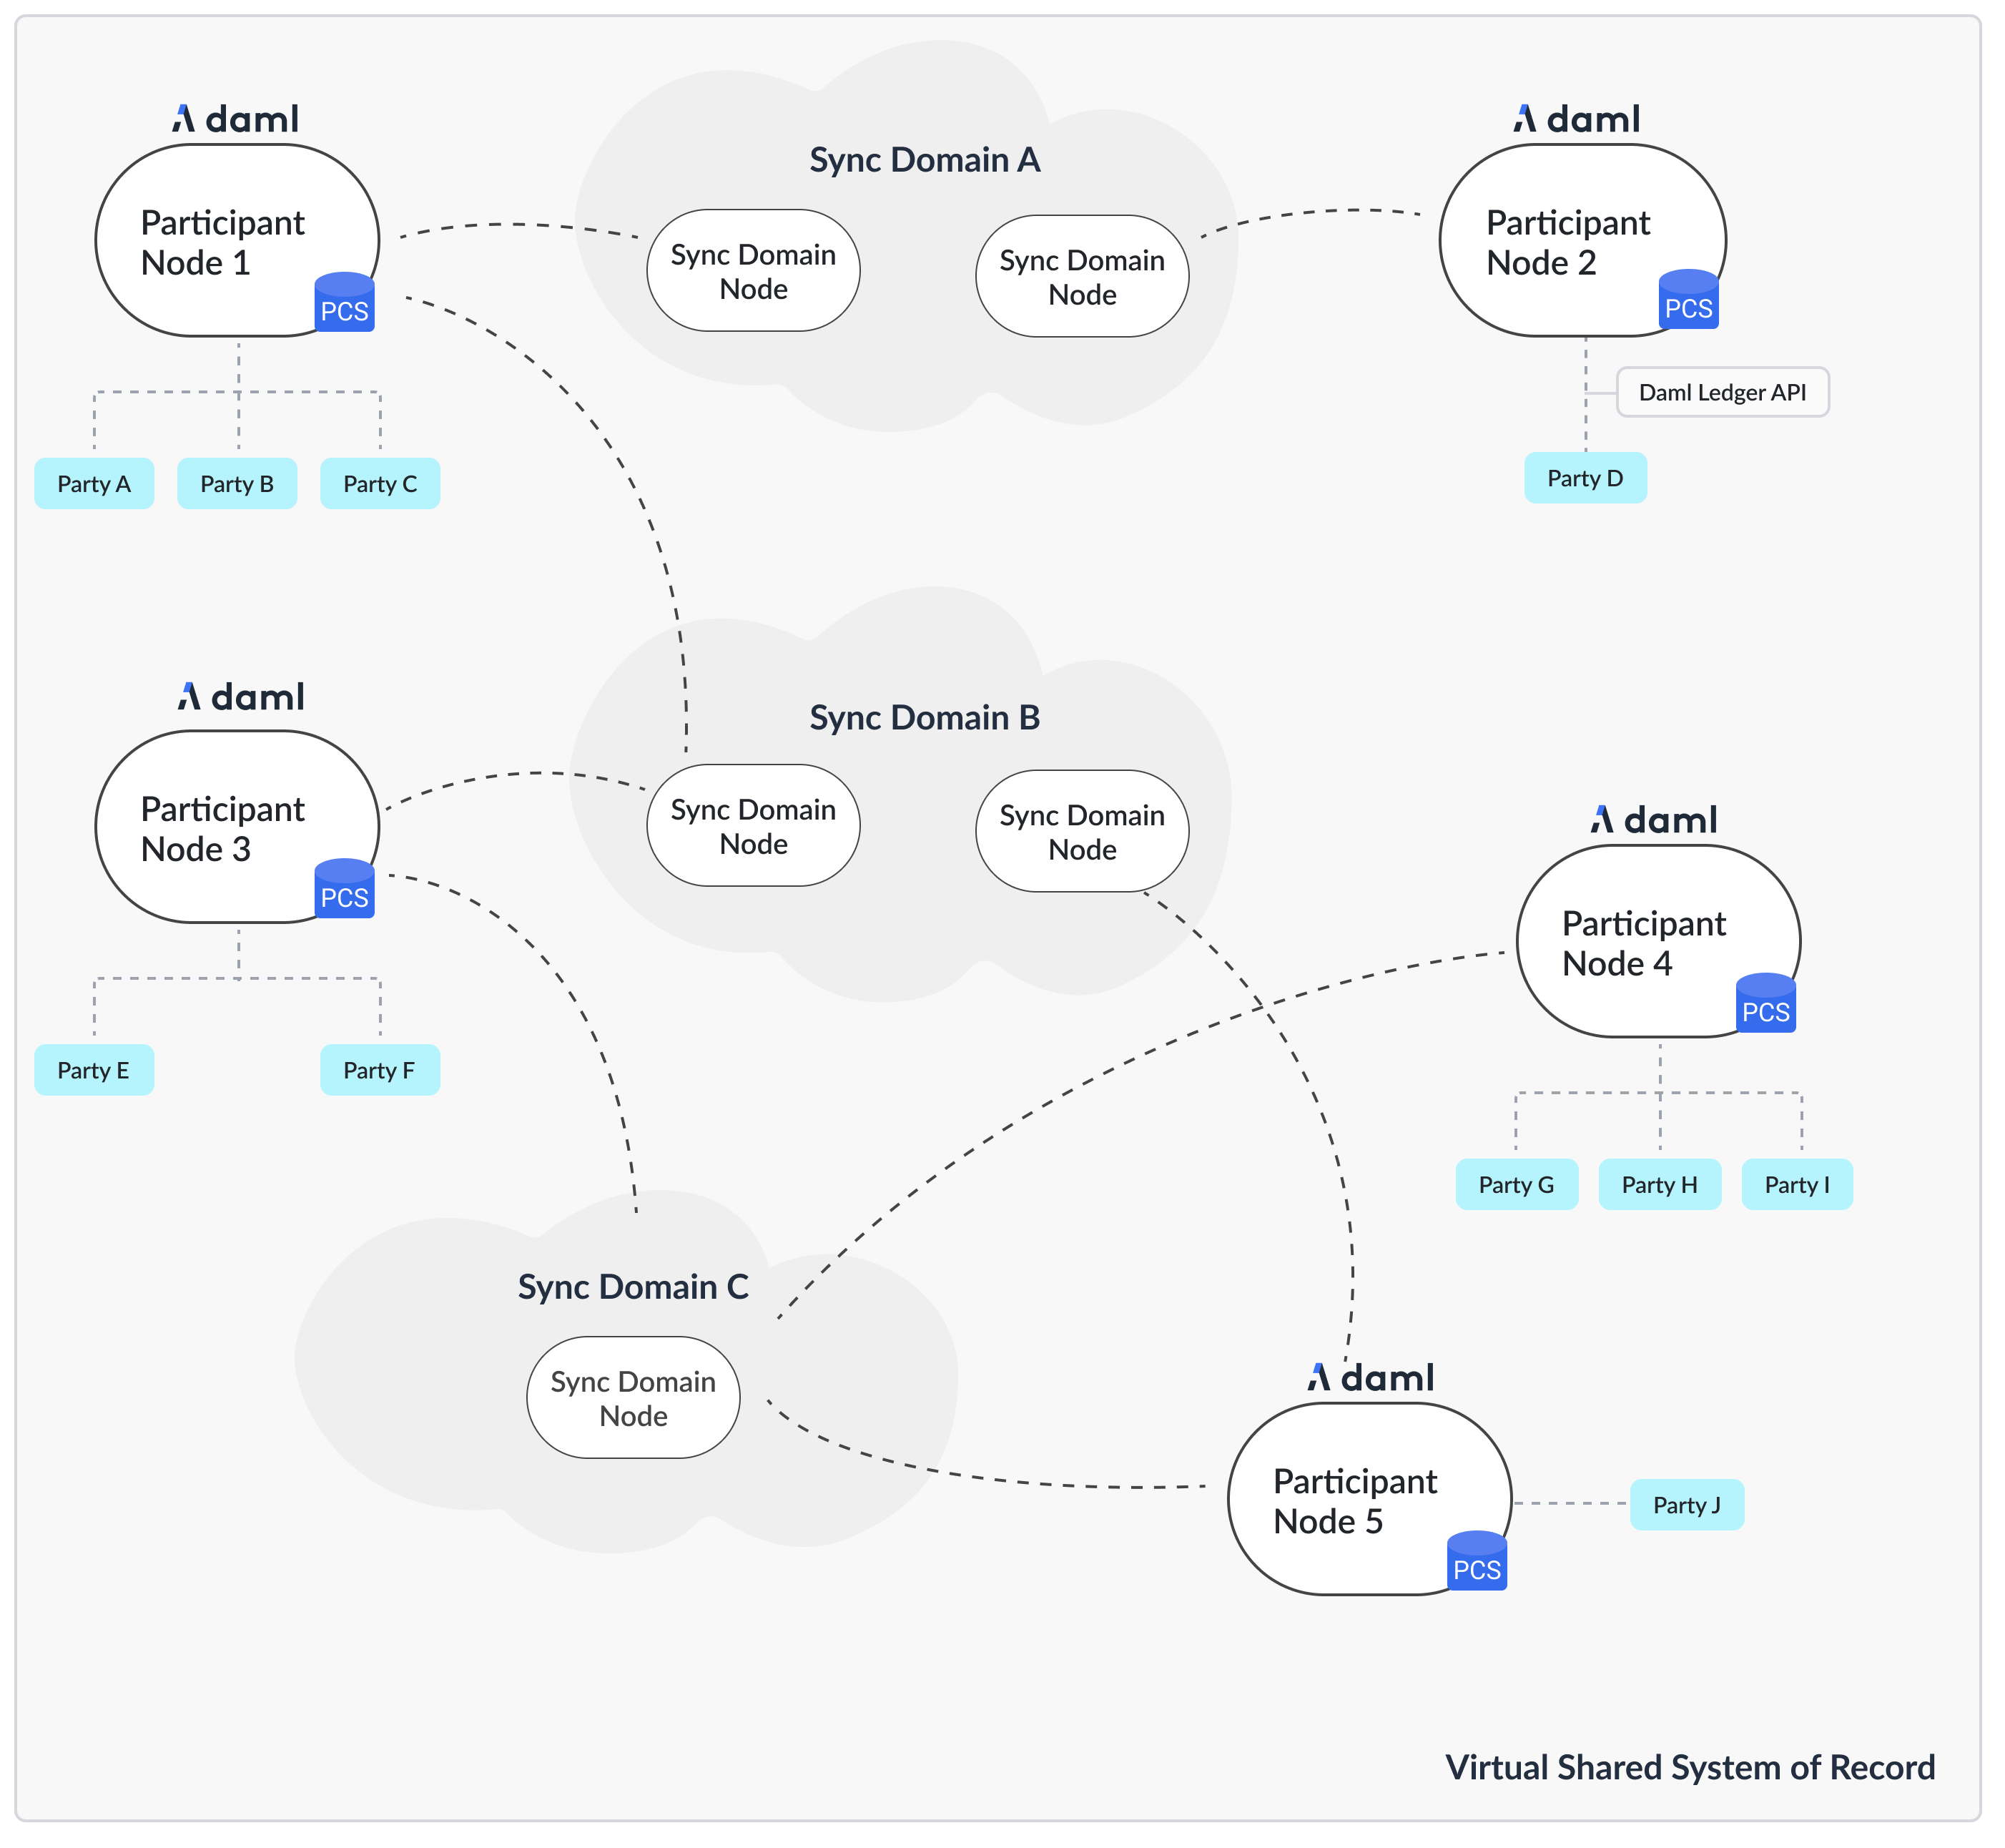
The Config Directory Contents
The config directory contains a set of reference configuration files, one per node type:participant.conf: a participant node configurationsequencer.conf,mediator.conf,manager.conf: a sequencer, mediator, and manager node configuration for a synchronizer deployment.sandbox.conf: a simple setup for a single participant node connected to a single synchronizer node, using in-memory stores for testing.
shared.conf: a shared configuration file that is included by all other configurations.jwt: contains JWT configuration files for the Ledger API.misc: contains miscellaneous configuration files useful for debugging and development.monitoring: contains configuration files to enable metrics and tracing.remote: contains configuration files to connect Canton console to remote nodes.storage: a directory containing storage configuration files for the various storage options.tls: contains TLS configuration files for the various APIs and a script to generate test certificates.utils: contains utility scripts, mainly to set up the database.
Selecting your Storage Layer
In order to run any kind of node, you need to decide how and if you want to persist the data. You can choose not to persist data and instead use in-memory stores that are deleted on node restart, or you can persist data using thePostgres database.
Multiple versions of Postgres are tested for compatibility with Canton and PQS in traditional deployment configurations. Postgres comes in many varieties that allow NFR trade-offs to be made (e.g., latency Vs. read operation scaling Vs. HA Vs. cost). Not all of these variants are tested for compatibility but all are expected to work with Canton and PQS. However, sufficient application testing is required to ensure that the SLAs of the Ledger API and PQS clients are met. In particular, serverless Postgres has transient behaviors which require a robust application testing process to verify that application SLAs are met (e.g., transaction latency is not greatly impacted by auto-scaling).
config/storage/) defined.
These storage mixins can be used with any of the node configurations. All the reference examples include the config/shared.conf, which in turn by default includes postgres.conf. Alternatively, the in-memory configurations just work out of the box without further configuration, but won’t persist any data. You can change the include within config/shared.conf.
The mixins work by defining a shared variable, which can be referenced by any node configuration
Could not resolve substitution to a value: ${_shared.storage}, then you forgot to add the persistence mixin configuration file.
Please also consult the more detailed section on storage configurations.
Persistence using Postgres
While in-memory is great for testing and demos, for any production use, you’ll need to use a database as a persistence layer. Canton supports Postgres as a persistence layer. Make sure you have a running Postgres server. Create one database per node. Canton is tested on a selection of the currently supported Postgres versions. See the Canton release notes for the specific Postgres version used to test a particular Canton release.Creating the Database and the User
Inutil/postgres you can find a script db.sh which helps configure the database, and optionally start a Docker-based Postgres instance. Assuming you have Docker installed, you can run:
config/util/postgres/db.env if they aren’t already set by environment variables. The script will start a non-durable Postgres instance (use start durable if you want to keep the data between restarts), and create the databases defined in config/util/postgres/databases.
Other useful commands are:
create-user: To create the user as defined indb.env.resume: To resume a previously stopped Docker-based Postgres instance.drop: Drop the created databases.
Database character encoding
For Canton applications to work correctly you must use UTF8 database server encoding in Postgres. This avoids any issues with character conversion, like not being able to store some UTF8 characters in the database. If the server character encoding is not set to UTF8, Canton reports an ERROR log message at startup. You can check Postgres database server encoding by connecting to the database via SQL console (for example psql) and issuing SHOW SERVER_ENCODING; Server encoding is set during database initialization to defaults deduced from OS environment, but this can be overridden. Please see Postgres documentation on this subject for further information.Configure the Connectivity
You can provide the connectivity settings either by editing the fileconfig/storage/postgres.conf or by setting respective environment variables (see the file for which ones need to be set):
Tuning the Database
Please note that Canton requires a properly sized and correctly configured database. Please consult the Postgres performance guide for further information.Generate the TLS Certificates
The reference example configurations use TLS to secure the APIs. You can find the configuration files inconfig/tls. The configuration files are split by different APIs. The configuration files are:
tls-ledger-api.conf: TLS configuration for the Ledger API, exposed by the participant node.mtls-admin-api.conf: TLS configuration for the Administration API, exposed by all node types.tls-public-api.conf: TLS configuration for the Public API, exposed by the sequencer and synchronizer node.
config/tls/gen-test-certs.sh to generate a set of self-signed certificates (which must include the correct SAN entries for the address the node will bind to).
Alternatively, you can also skip this step by commenting out the TLS includes in the respective configuration files.
Setting up a Participant
Start your participant by using the reference exampleconfig/participant.conf:
daemon is optional. If omitted, the node will start with an interactive console. There are various command line options available, for example to further tune the logging configuration.
By default, the node will initialize itself automatically using the identity commands
identity-commands. As a result, the node will create the necessary keys and topology transactions and will initialize itself using the name used in the configuration file. Please consult the identity management section for further information.Secure the APIs
- By default, all APIs in Canton are only accessible from localhost. If you want to connect to your node from other machines, you need to bind to
0.0.0.0instead of localhost. You can do this by settingaddress = 0.0.0.0or to the desired network name within the respective API configuration sections. - All nodes are managed through the administration API. Whenever you use the console, almost all requests will go through the administration API. It is recommended that you set up mutual TLS authentication as described in the TLS documentation section.
- Applications and users interact with the Participant Node using the gRPC Ledger API. We recommend that you secure your API by using TLS. You should also authorize your clients using JWT tokens. The reference configuration contains a set of configuration files in
config/jwt, which you can use as a starting point.
Configure Applications, Users and Connection
Canton distinguishes static from dynamic configuration.- Static configuration are items which are not supposed to change and are therefore captured in the configuration file. An example is to which port to bind to.
- Dynamic configuration are items such as Daml archives (DARs), synchronizer connections, or parties. All such changes are effected through console commands (or the administration APIs).
Setting up a Synchronizer
Your participant node is now ready to connect to other participants to form a distributed ledger. The connection is facilitated by a synchronizer, which is formed by three separate processes:- a sequencer, which is responsible for ordering encrypted messages
- a mediator, which is responsible for aggregating validation responses by the individual participants
- a synchronizer manager, which is responsible for verifying the validity of topology changes (distributed configuration changes) before they are distributed on the synchronizer
- Postgres-based synchronizer
- Native Canton BFT driver (used for the Canton Network).
Using Microservices
You can start the synchronizer processes as separate microservices:Connect the Participant
The final step is to connect the participant to the synchronizer. Refer to the connectivity guide for detailed instructions. In the simplest case, you just need to run the following command in the participant’s console:Secure the APIs
- As with the participant node, all APIs bind by default to localhost. If you want to connect to your node from other machines, you need to bind to the right interface or to
0.0.0.0. - The administration API should be secured using client certificates as described in TLS documentation section.
- The Public API needs to be properly secured using TLS. Please follow the corresponding instructions.